A Martian "Omnirama": The Story of a Discovery
MGS 06304
I've "coined" the term "Omnirama" from "omni-" and "panorama", to convey that the anomaly group you are about to see is panoramic, and quite a bit more.
If you're familiar with the workings of imaging, you may well want to skip ahead a page or two, but I'm going to take this opportunity to both tell the story of a discovery, and to share insights into the workings of anomaly image processing, in hopes it will help inspire someone to follow suit (Also inspiring is the vast amount of exciting searching left to be done, and the wondrous opportunities that yet await).
In truth, it's often been encouraged for these demonstrations to show side-by-side comparisons with the processed and color-indicated images, which unfortunately webspace limitations make it exceedingly hard to do. Suffice to say this also at least doubles the download time- even more to show the work step-by-step, and that is merely using the inferior compressed, jpeg versions of the images that are simply not preferable for the truest kind of serious study of an anomaly.
Hopefully, therefore, this exercise will serve as an example of the validity of other images which stand alone.
What is best is that you double check these observations with the source images, and if possible, repeat the steps that were used, to confirm these findings for yourself... and perhaps you even will gain a feel for the wonderful adventure of anomaly hunting, and make many worthy discoveries of your own. Due to the fast-paced manner of my own searches, and the uniqueness and value of each different person's eye and recognition abilities, there are always additional discoveries waiting to be made... some of them with no further image processing at all.
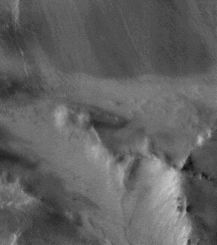
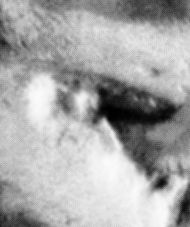
 This is MGS 06304b, shown at 1/4 original size. At right is more of a close-up of the area we are most interested in. As you can see, it has an intriguing form, a "v" shape, that's reminiscent of "heads" found so many times before in extraterrestial image data, seeming to fall into three categories- all of them popular ancient Egyptian animal motifs- bats, bulls, and the jackal-head of Anubis.
Premier planetary anomalist "kksamuria", has even offered a tentative explanation for them, proving at least that anomalists are generally far more willing to listen to alternatives than their cynical critics. Worthy of any geologist, kk's impressive effort still seemingly cannot account for all of these general forms which possess faces, their occurence even in places such as sheer cliff faces, nor the uncanny rate at which they can be found in meaningful places, such as between the two scales of a balance, another Egyptian designs, where many tentative jackal-heads have been seen.
Hence, we have every reason to be curious, and this image certainly deserves further investigation.
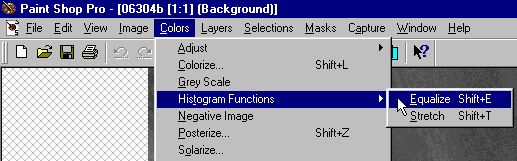 At right, is a screen capture of the Paint Shop Pro window as I am using it, showing to access the the histogram equalization function that is used to create a better constrast for viewing certain objects.
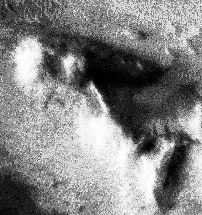
At left, below, is a reduced version of what the equalized image looks like.
 The more homogenous values with which space images are presented aren't always flattering to many of the details, particularly many of the finer ones, even though the use of equalization or contrast controls often creates a trade-off where some things are made far more visible, while others things in the image are made less visable.
This is yet another reason why many of my single-version studies still have many mysterious treasures just waiting for a discoverer.
Even though the addition of contrast adjustments to the effects of equalization often creates results that are more pleasing to the eye, and more effective, or that the effects of equalization can be substituted for by careful, deliberate constrast adjuestments, by using the equalization control alone to make these changes in the image, I'm saving time, and I'm using a process that is extremely easy for others to repeat in order to verify my observations. To use equalization, I simply put the pointer on the word "colors" to get the drop-down menu options, move the pointer down to "histogram functions" to get the side menu to pop out, point to "equalize", and click! It's magic! It's just that simple!
Notice also while you're looking, the negative control on the drop-down menu. This is another tool I like to use. It's even simpler than the equalization, there's no side menu, you just point and click right there. While it's role in determining the validity of an observation may be controversial, looking at the negative gives you a different perspective that can help you see many more things in images, and unlike other enhancement techniques, it is virtually immune to the premise often maintained by imaging purists that enhancement techiques "destroy" data, as opposed to presenting the data properly, because unlike other techniques, it is reversible even in a saved image.
I actually use the negative function so much that I rarely bother to point out when I have. I have every hope that you will find out for sure when you double check the source image, and you should. What we're talking about here is amazing, earth-shaking, and incredible... not only are there a few mischievious types out there, but extraterrestial anomalies are really nothing you should just take someone's word for!
(In fact, that's how I got started... I saw something so amazing in Liz Edward's work that I just had to make sure for myself, and all of the sudden, I found out that even if I may never be very good at it, I can do imaging well enough to get meaningful results... and so can you!)
 Equalization, however, as you can see in the example above, tends to create a "fuzzy" pattern in the image. Some type of blur control is normally used to "nudge the data back into place". As contrary as it may sound that blurring an image is going to make it more clear, this idea of blurring the data into shape is closely akin to the box filtering methods that were used to process the first releases of images from MGS's reimaging of Cydonia, and the same principle holds true there. The use of a blur-like technique to de-streak the image by "nudging" the data back into place relies on the fact that the streaking of the instrument signature isn't lost data.
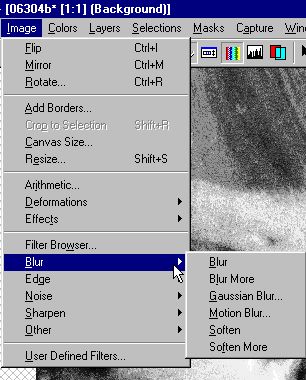
At left, another screen capture of the PSP 5 controls showing how the functions are obtained, in the same way as the equalization function and just as easy.
This drop-down menu also gives you access to the sharpen control. One or two applications of the sharpen control can often help compensate for any excesses in the various blurring controls especially, for example, if you using a control with a pre-set value and are not using a control such as the Gaussian blur which allows you to specify yourself just how much of the effect you wish to use.
The result, at upper left, even before the use of any sharpening function, is even more photogenic- and photo-like- than the original, pasty-looking, processed space image we started with. What is more, is that we are beginning to see, even at the small scale of this example, many more odd, interesting, and potentially anomalous details. This is starting to get good...
Next Page
Return to Solar System Anomalies III Index
